Hey guys! Since my brother Steve’s last guest post about his epic winter ascent of Mt. Hood was such a hit, he’s back to share another guest post, this time about summiting Mt. Rainier last summer!

I’ll let him take it away – thanks for sharing with us, Steve! (Psst: while you’re at it, check out my recap from the Mt. St. Helens summit hike Matt and I did with Steve back in October – most intense hike of my life!)
Summiting Mt. Rainier
A guest post by Anne’s brother Steve
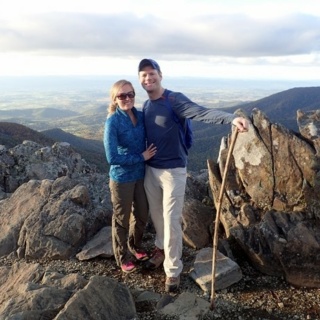
Climbing Mt. Rainier has been on my list of things to do since I moved to Washington State – you can see the mountain super clearly from Ft. Lewis (where I’m stationed). I can remember it being a welcome sight as it towered over everything when I took my first trip out here back in 2008. As a result, when a friend of mine from mentioned that he was putting together a Mt. Rainier trip, I jumped at the opportunity to tag along. Pictured below is Mt. Rainier in the background of a hike Anne and I did back in late summer of 2015 (here’s a link to her blog recap from that: Hiking Mount Rainier National Park).

Summiting Mt. Rainier requires a bit more equipment than I had, though, even with all of the military gear I’ve been issued. So, I had to pick up/rent a bunch of new stuff. Pictured below is my packing list:

I brought the half-rope (30 meter 8.5mm rope) for rescue/emergency; we used a 60 meter 10mm rope that my buddy Dustin (the most experienced of us) brought. Ended up cutting two of the MREs out and it was just enough food for 3 days, two nights. I had a bunch of Larabars, which I like a lot because even when they freeze they don’t get hard, so you can still chew them. Also had a lot of Gatorade gel packs, which are great for immediate energy. Pictured is my pack with everything in it:

We left early on the morning of June 27th, getting to the mountain and registered by about 9:30. To climb Mt. Rainier, you go and fill out an info sheet for your party, pay a fee, and then get an annual climbing pass for the mountain. We started from Paradise, which is the main lodge area on the mountain and had tons of people hanging out and staying there for day hikes. Pictured below is Rainier from Paradise.

The route up to Camp Muir goes along some pretty well-trafficked paths for a bit, basically taking you up to the Muir Snowfields, which is the final part of the route going up to Camp Muir. We started out in hiking shoes with no trekking poles and then switched to heavier boots and poles as we hit the snowfield.

We had a bit of an emergency when one of Dustin’s shoulder straps ripped out from his bag. He repaired it with parachute cord tied to the frame and used it the remainder of the trip. We were pretty worried, as if he hadn’t been able to fix it, he would’ve been without a bag for the rest of the trip! This is a photo of the repair:

The Muir snowfields get pretty steep, so poles were very helpful. Didn’t use crampons, though, as it was mostly soft snow at this time during the summer. It’s a bit of a meandering route, too. We followed the flags that had been put down by various groups or rangers heading up and it was fairly simple to make it. The photo below shows how steep it could get.

Made it to Camp Muir at about 2 pm or so, and once we got there we set up our (rented) mountaineering tent and started melting snow for water and getting ready to turn in. Unfortunately all of us got a terrible sunburn on our elbows on the way up; despite putting on a lot of sunscreen, the reflection from the snow and the intense sun burned the back of our arms and elbows to a crisp.
Camp Muir is a collection of brick buildings, including a few latrines and a few shelters/guide stations. There were lots of guided groups with hot soup and hot water – made us a bit jealous as we melted our snow! This is a photo of Camp Muir:

And a photo of our little setup, in a small depression sheltered from the wind:

After going to sleep early Monday night, we woke up late Tuesday and spent the day practicing mountaineering skills/prepping for our summit attempt. We roped up and walked around for a while, made sure our crampons were fitted well, practiced some knots, and set up a snow anchor and a z-pulley to practice doing a rescue in the event someone fell into a crevasse/off the side. So, a good day of prep. Here’s a photo of the water boiling setup in camp as I made dinner:

We got up at about 10pm that night to prep and left at 11pm. We left then so we could do the ascent before the sun came up, partly so that it was cooler and we would get there as the sun did, and partly because the sun was going to turn the snow to slush and could also bring in clouds, too. We went to sleep at about 6 or so, but I don’t think many of us got much sleep. This is a photo of us getting ready that night:

This is me with the harness on getting attached to the rope. You can see my water bottle dangling from my harness, as well as my down jacket in its stuff sack on my hip. I carried everything in a small waist-pack instead of taking my full backpack on the ascent.

The route we took, pictured below, was the standard one (called the Disappointment Cleaver route because of one of the terrain features you traverse).

You go through some nasty scrambles on rock in the route. I was the #1 man on the rope, so I had to find the route as we were going, which was pretty challenging as I didn’t know where we were going. Luckily it hadn’t snowed recently so I could follow tracks in the snow, but the rock portions were very confusing, and I had to guess which way to go. Figured it out, though! Here’s a photo showing just how dark it was before the sun came up along the route:

Because it was nearly pitch black, you had to follow a combination of boot tracks in the snow and reflective flags in the rock areas. Here’s a nice picture of sunrise as we neared the High Break.

I didn’t really feel the altitude at all, honestly. I was feeling really strong and energetic the whole time. Some of the other folks in our group were hurting more from the elevation – getting very short of breath and light headed. Had to pull a bit on the rope at times to keep everyone moving, as I was up front. Made it to the top, though, and then it was easy going down. No big crevasses to cross yet – we crossed about 6 or 7 but they had snow bridges or were short enough to hop across; no ladders. Just before hitting the top, you go through the crater, which is pretty neat. Very flat and open after steep and mountainous terrain:

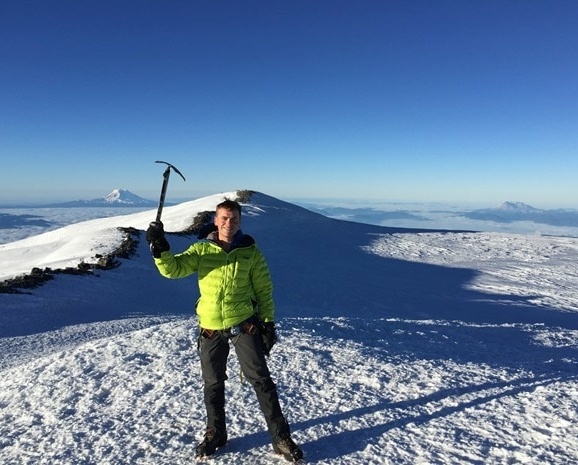
Took us about 7 hours overall. Here’s a photo of our whole group at the top (14,416 feet):

Here’s me drinking a can of Rainier beer at the summit (a summit tradition). Very refreshing!

And here are two panoramas from the top. (Note from Anne: click on these panorama pictures to see them larger!)


The way down was pretty easy, the snow was softening so you had to be a bit more careful not to slide, but overall not that difficult. Here are some photos from the descent:

This is me as we started the descent. You can see I have a significant portion of the rope coiled around me – I had a lot of rope and the rear man did as well. This was because we didn’t want too much slack between each person on the rope, and because it gave us extra slack on either end with which to set up anchors in the event someone in between fell. You can also see I still have my goggles on – I forgot my sunglasses at the tent!

Going down switchbacks, you can see me up front:

These are the flags that marked the route. Luckily they’re reflective, so it’s easy to tell where you’re going at night.

This is a photo showing us let another group go past that was moving faster, as I recall. You can see the dramatic view you have as you go down. Made the walk down fun being able to see the mountains so clearly!

This is a view of a crevasse near the route. Most of the crevasses were not very large yet, as it was still early in the summer. As it continues to warm, they expand and the snowbridges over them will collapse and be replaced by ladders.

Took us about 4 hours to get back down. We got off track in the rocky areas a bit, but were able to get down easily, just a bit more scrambling. Was very nice to get back to camp and have some hot food after about 12 hours up on the mountain! Here’s a photo of one of the crevasses we crossed, taken from the crossing point and looking into it. It continued like this on the opposite side as well:

Once we got back to camp, a few of the guys took a nap and we boiled some more snow for the walk down and broke down our camp. I was eager to be done and get my boots off, so I bombed down to the parking lot and got there about an hour ahead of the rest of the group. Was nice, as I was able to get rid of all my trash, sign out at the climbing info center, and lay my wet stuff out to dry while I waited. I think I also had some pent up energy after being roped in all day! We then drove back, getting a burger at a diner out in the Washington boonies, before parting ways. Overall, a very fun trip, and I’m hoping to continue on to some of the other big mountains in Washington before I depart!
Thanks for reading! Stay tuned for one more recap, coming soon, of my Mt. Adams climbs. – Steve